> ## Documentation Index
> Fetch the complete documentation index at: https://help.polygon-one.com/llms.txt
> Use this file to discover all available pages before exploring further.
# Settings
> Configure your profile, API keys, notifications, CSV imports, and automations
## Overview
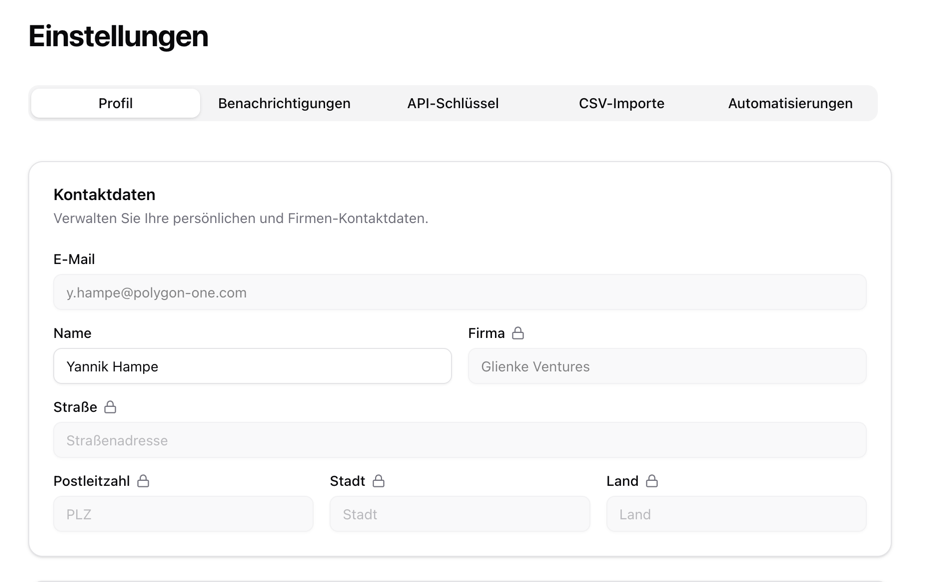
Under **Settings**, you manage your company profile, integrations, and automations. The page is currently divided into five areas: **Profile**, **Notifications**, **API Keys**, **CSV Imports**, and **Automations**.
 ***
## Profile
### Contact Details
Maintain your company's master data:
| Field | Description |
| --------------- | ------------------------------------ |
| **Name** | Your full name |
| **Email** | Your login email (cannot be changed) |
| **Company** | Company name |
| **Street** | Street and house number |
| **Postal Code** | Postal code |
| **City** | City |
| **Country** | Company location |
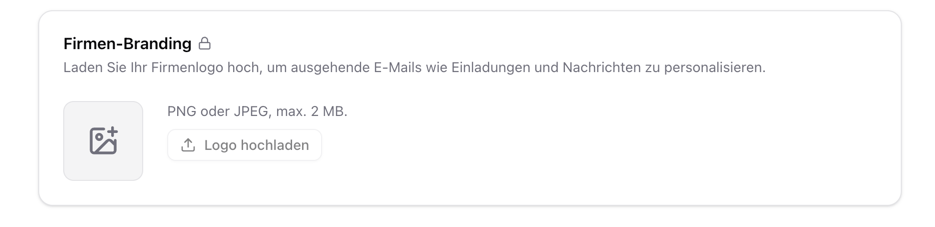
### Company Branding
Upload your company logo (PNG or JPEG, max. 2 MB). The logo is displayed in reports and in the supplier portal.
***
## Profile
### Contact Details
Maintain your company's master data:
| Field | Description |
| --------------- | ------------------------------------ |
| **Name** | Your full name |
| **Email** | Your login email (cannot be changed) |
| **Company** | Company name |
| **Street** | Street and house number |
| **Postal Code** | Postal code |
| **City** | City |
| **Country** | Company location |
### Company Branding
Upload your company logo (PNG or JPEG, max. 2 MB). The logo is displayed in reports and in the supplier portal.
 ### TRACES Integration
Connect Polygon One with the EU TRACES-NT system for automatic DDS submission:
| Field | Description |
| ----------------------------------- | ---------------------------------------------- |
| **EORI Number** | Your EORI registration number |
| **TRACES Username** | Your TRACES-NT username |
| **TRACES Web Service Access Token** | Your web service access key (displayed hidden) |
You obtain your TRACES credentials through the EU Login portal. A step-by-step guide is available under [TRACES Registration](/en/eudr/onboarding/traces).
### Confidential Geolocation
Enable the option **"Confidential treatment of geolocation data"** to request confidential treatment of your geo data in DDS submissions.
### Change Password
In the **Change Password** area, you can update your login password. You will need your current password to do so.
***
## Notifications
Control which notifications you receive through which channel.
### TRACES Integration
Connect Polygon One with the EU TRACES-NT system for automatic DDS submission:
| Field | Description |
| ----------------------------------- | ---------------------------------------------- |
| **EORI Number** | Your EORI registration number |
| **TRACES Username** | Your TRACES-NT username |
| **TRACES Web Service Access Token** | Your web service access key (displayed hidden) |
You obtain your TRACES credentials through the EU Login portal. A step-by-step guide is available under [TRACES Registration](/en/eudr/onboarding/traces).
### Confidential Geolocation
Enable the option **"Confidential treatment of geolocation data"** to request confidential treatment of your geo data in DDS submissions.
### Change Password
In the **Change Password** area, you can update your login password. You will need your current password to do so.
***
## Notifications
Control which notifications you receive through which channel.
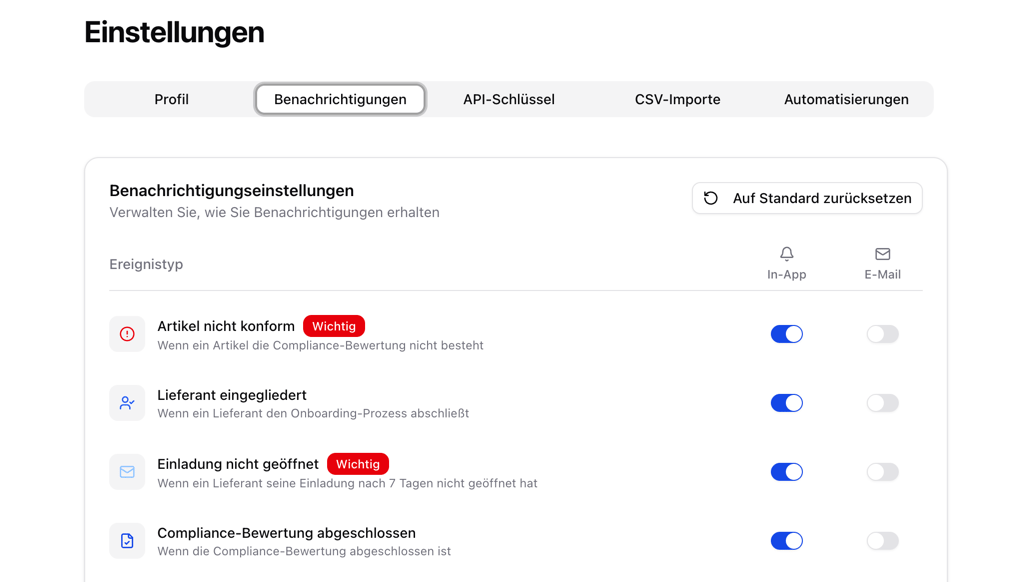 For each notification type, you can enable or disable two channels separately:
| Channel | Description |
| ---------- | ------------------------------------------------------------------------------- |
| **In-App** | Notification in the [Notification Center](/en/eudr/optional/benachrichtigungen) |
| **Email** | Notification by email |
Particularly important events (e.g., failed DDS submissions) are marked with the **"Important"** badge.
Using **"Reset to default settings"**, you can restore the recommended configuration at any time.
***
## API Keys
Create API keys to integrate Polygon One into your system landscape.
For each notification type, you can enable or disable two channels separately:
| Channel | Description |
| ---------- | ------------------------------------------------------------------------------- |
| **In-App** | Notification in the [Notification Center](/en/eudr/optional/benachrichtigungen) |
| **Email** | Notification by email |
Particularly important events (e.g., failed DDS submissions) are marked with the **"Important"** badge.
Using **"Reset to default settings"**, you can restore the recommended configuration at any time.
***
## API Keys
Create API keys to integrate Polygon One into your system landscape.
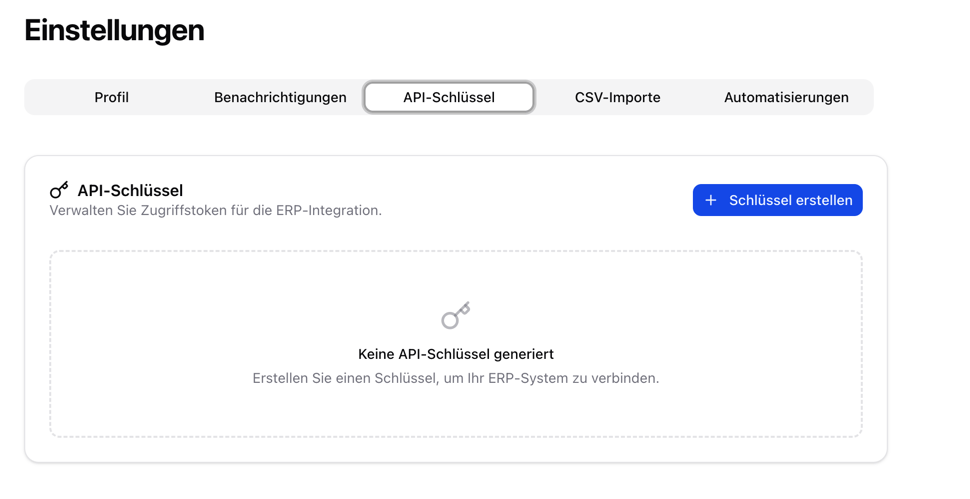 ### Create a Key
Click **"Create key"**.
Assign a name and select the desired permissions:
| Area | Read | Write |
| ------------------ | ---------------- | ----------------- |
| **Articles** | `articles:read` | `articles:write` |
| **Suppliers** | `suppliers:read` | `suppliers:write` |
| **Orders** | `orders:read` | `orders:write` |
| **DDS Statements** | `dds:read` | `dds:write` |
The API key is displayed **only once**. Copy it immediately and store it securely.
An API key cannot be displayed again after creation. If it is lost, a new key must be created.
In addition, you can **revoke** existing keys at any time. Use separate keys for different integrations so that read and write permissions remain cleanly separated.
Further details on API usage can be found in the [API Reference](/en/api-reference/introduction).
***
## CSV Imports
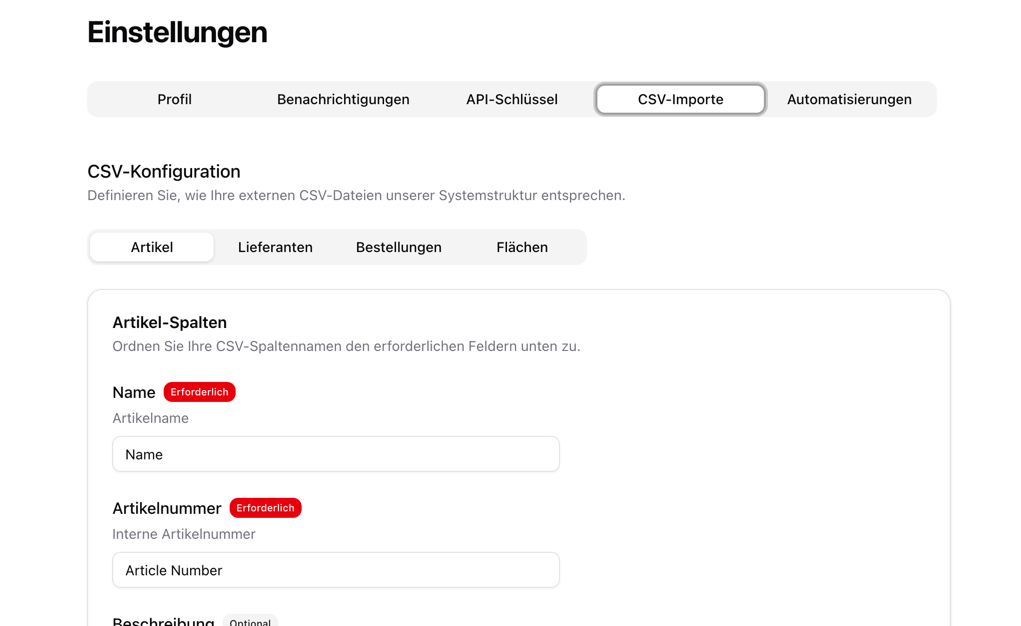
Configure the column mapping for CSV imports. Polygon One supports the import of five data types:
Map your CSV column headers to the Polygon One fields (e.g., `HS code`, `article name`, `commodity group`). Required and optional fields are clearly marked.
Map columns such as `company name`, `country`, and `email address` to the corresponding system fields.
Configure the mapping for order data (order number, article assignment, quantity, etc.).
Map columns for geo data (plot name, coordinates, production period, etc.).
Map columns to link output articles to their input articles (bill of materials / BOM) — for example, via the article numbers of the output and input articles.
### Create a Key
Click **"Create key"**.
Assign a name and select the desired permissions:
| Area | Read | Write |
| ------------------ | ---------------- | ----------------- |
| **Articles** | `articles:read` | `articles:write` |
| **Suppliers** | `suppliers:read` | `suppliers:write` |
| **Orders** | `orders:read` | `orders:write` |
| **DDS Statements** | `dds:read` | `dds:write` |
The API key is displayed **only once**. Copy it immediately and store it securely.
An API key cannot be displayed again after creation. If it is lost, a new key must be created.
In addition, you can **revoke** existing keys at any time. Use separate keys for different integrations so that read and write permissions remain cleanly separated.
Further details on API usage can be found in the [API Reference](/en/api-reference/introduction).
***
## CSV Imports
Configure the column mapping for CSV imports. Polygon One supports the import of five data types:
Map your CSV column headers to the Polygon One fields (e.g., `HS code`, `article name`, `commodity group`). Required and optional fields are clearly marked.
Map columns such as `company name`, `country`, and `email address` to the corresponding system fields.
Configure the mapping for order data (order number, article assignment, quantity, etc.).
Map columns for geo data (plot name, coordinates, production period, etc.).
Map columns to link output articles to their input articles (bill of materials / BOM) — for example, via the article numbers of the output and input articles.
 ### Value Mappings
In addition to columns, you can also map **values**. If your CSV file uses, for example, `"Einkauf"` instead of `"purchase"`, you can define a mapping so that the import works correctly.
Using **"Reset to default mappings"**, you can reset the configuration to the default values at any time.
***
## Automations
Automate recurring steps in the DDS workflow.
### Value Mappings
In addition to columns, you can also map **values**. If your CSV file uses, for example, `"Einkauf"` instead of `"purchase"`, you can define a mapping so that the import works correctly.
Using **"Reset to default mappings"**, you can reset the configuration to the default values at any time.
***
## Automations
Automate recurring steps in the DDS workflow.
 ### Orders & DDS
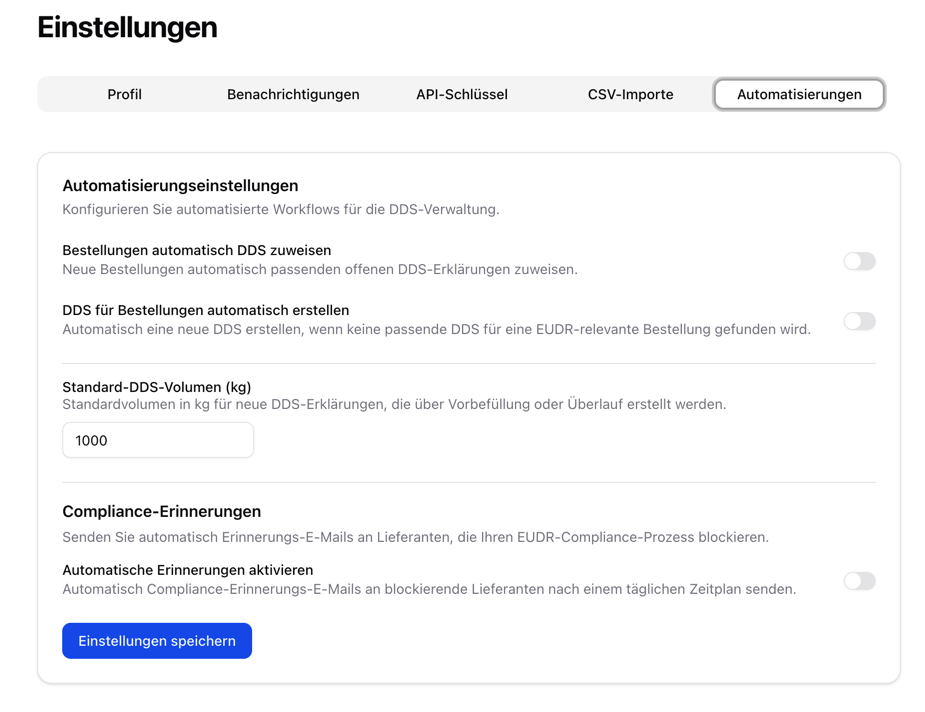
| Automation | Description |
| ----------------------------------------- | ------------------------------------------------------------- |
| **Automatically assign orders to a DDS** | New orders are automatically matched to a suitable DDS |
| **Automatically create a DDS for orders** | If no suitable DDS exists, a new one is created automatically |
| **Default DDS volume (kg)** | The default volume (in kg) for automatically created DDS |
### Invitation Reminders
| Setting | Description |
| ----------------------------- | ------------------------------------------------------------------------------------------------------------------------------------------------------------------------------------ |
| **Send invitation reminders** | Suppliers receive a reminder 7 days after the invitation is sent if they have not yet opened it. If the invitation remains unopened after 14 days, your administrators are notified. |
### Compliance Reminders
Send automatic reminders to suppliers who have not yet provided their compliance data:
| Setting | Description |
| ------------------- | -------------------------------------------------------------------- |
| **Enable** | Turn automatic reminders on or off |
| **Delay (days)** | How many days after the invitation the first reminder is sent (1–90) |
| **Cooldown (days)** | Minimum interval between reminders to the same supplier (1–90) |
Compliance reminders are only sent to suppliers who have provided an email address and whose compliance status is still open.
#### Escalation Stages (optional)
Instead of a single reminder, you can configure a **multi-stage escalation**. As soon as stages are present, they **replace** the single reminder above: each stage waits its own number of days and sends its own message. After the last stage, the reminder ladder stops.
### Orders & DDS
| Automation | Description |
| ----------------------------------------- | ------------------------------------------------------------- |
| **Automatically assign orders to a DDS** | New orders are automatically matched to a suitable DDS |
| **Automatically create a DDS for orders** | If no suitable DDS exists, a new one is created automatically |
| **Default DDS volume (kg)** | The default volume (in kg) for automatically created DDS |
### Invitation Reminders
| Setting | Description |
| ----------------------------- | ------------------------------------------------------------------------------------------------------------------------------------------------------------------------------------ |
| **Send invitation reminders** | Suppliers receive a reminder 7 days after the invitation is sent if they have not yet opened it. If the invitation remains unopened after 14 days, your administrators are notified. |
### Compliance Reminders
Send automatic reminders to suppliers who have not yet provided their compliance data:
| Setting | Description |
| ------------------- | -------------------------------------------------------------------- |
| **Enable** | Turn automatic reminders on or off |
| **Delay (days)** | How many days after the invitation the first reminder is sent (1–90) |
| **Cooldown (days)** | Minimum interval between reminders to the same supplier (1–90) |
Compliance reminders are only sent to suppliers who have provided an email address and whose compliance status is still open.
#### Escalation Stages (optional)
Instead of a single reminder, you can configure a **multi-stage escalation**. As soon as stages are present, they **replace** the single reminder above: each stage waits its own number of days and sends its own message. After the last stage, the reminder ladder stops.
 You configure the following per stage:
| Field | Description |
| ----------------------- | ------------------------------------------------------------------------------------------------------------------- |
| **Send after (days)** | Stage 1 counts from the invitation date; each further stage counts from when the previous reminder was sent (1–365) |
| **Subject** (optional) | Email subject (max. 200 characters) |
| **Headline** (optional) | Headline of the email (max. 150 characters) |
| **Message** (optional) | Message body (max. 4000 characters) |
The text fields are **prefilled with the default wording** — edit them, or leave a field blank to use the default text. Plain text only; formatting is removed before the email is sent.
Use **"Add stage"** to add more stages and **"Remove"** to delete individual ones. Without configured stages, the simple reminder with delay and cooldown applies.
You configure the following per stage:
| Field | Description |
| ----------------------- | ------------------------------------------------------------------------------------------------------------------- |
| **Send after (days)** | Stage 1 counts from the invitation date; each further stage counts from when the previous reminder was sent (1–365) |
| **Subject** (optional) | Email subject (max. 200 characters) |
| **Headline** (optional) | Headline of the email (max. 150 characters) |
| **Message** (optional) | Message body (max. 4000 characters) |
The text fields are **prefilled with the default wording** — edit them, or leave a field blank to use the default text. Plain text only; formatting is removed before the email is sent.
Use **"Add stage"** to add more stages and **"Remove"** to delete individual ones. Without configured stages, the simple reminder with delay and cooldown applies.